Introduction
Boxo Payments is an in-app payment functionality that enables host app users to complete payments for orders within the miniapp.Boxo Payments flow
Boxo Payments flow
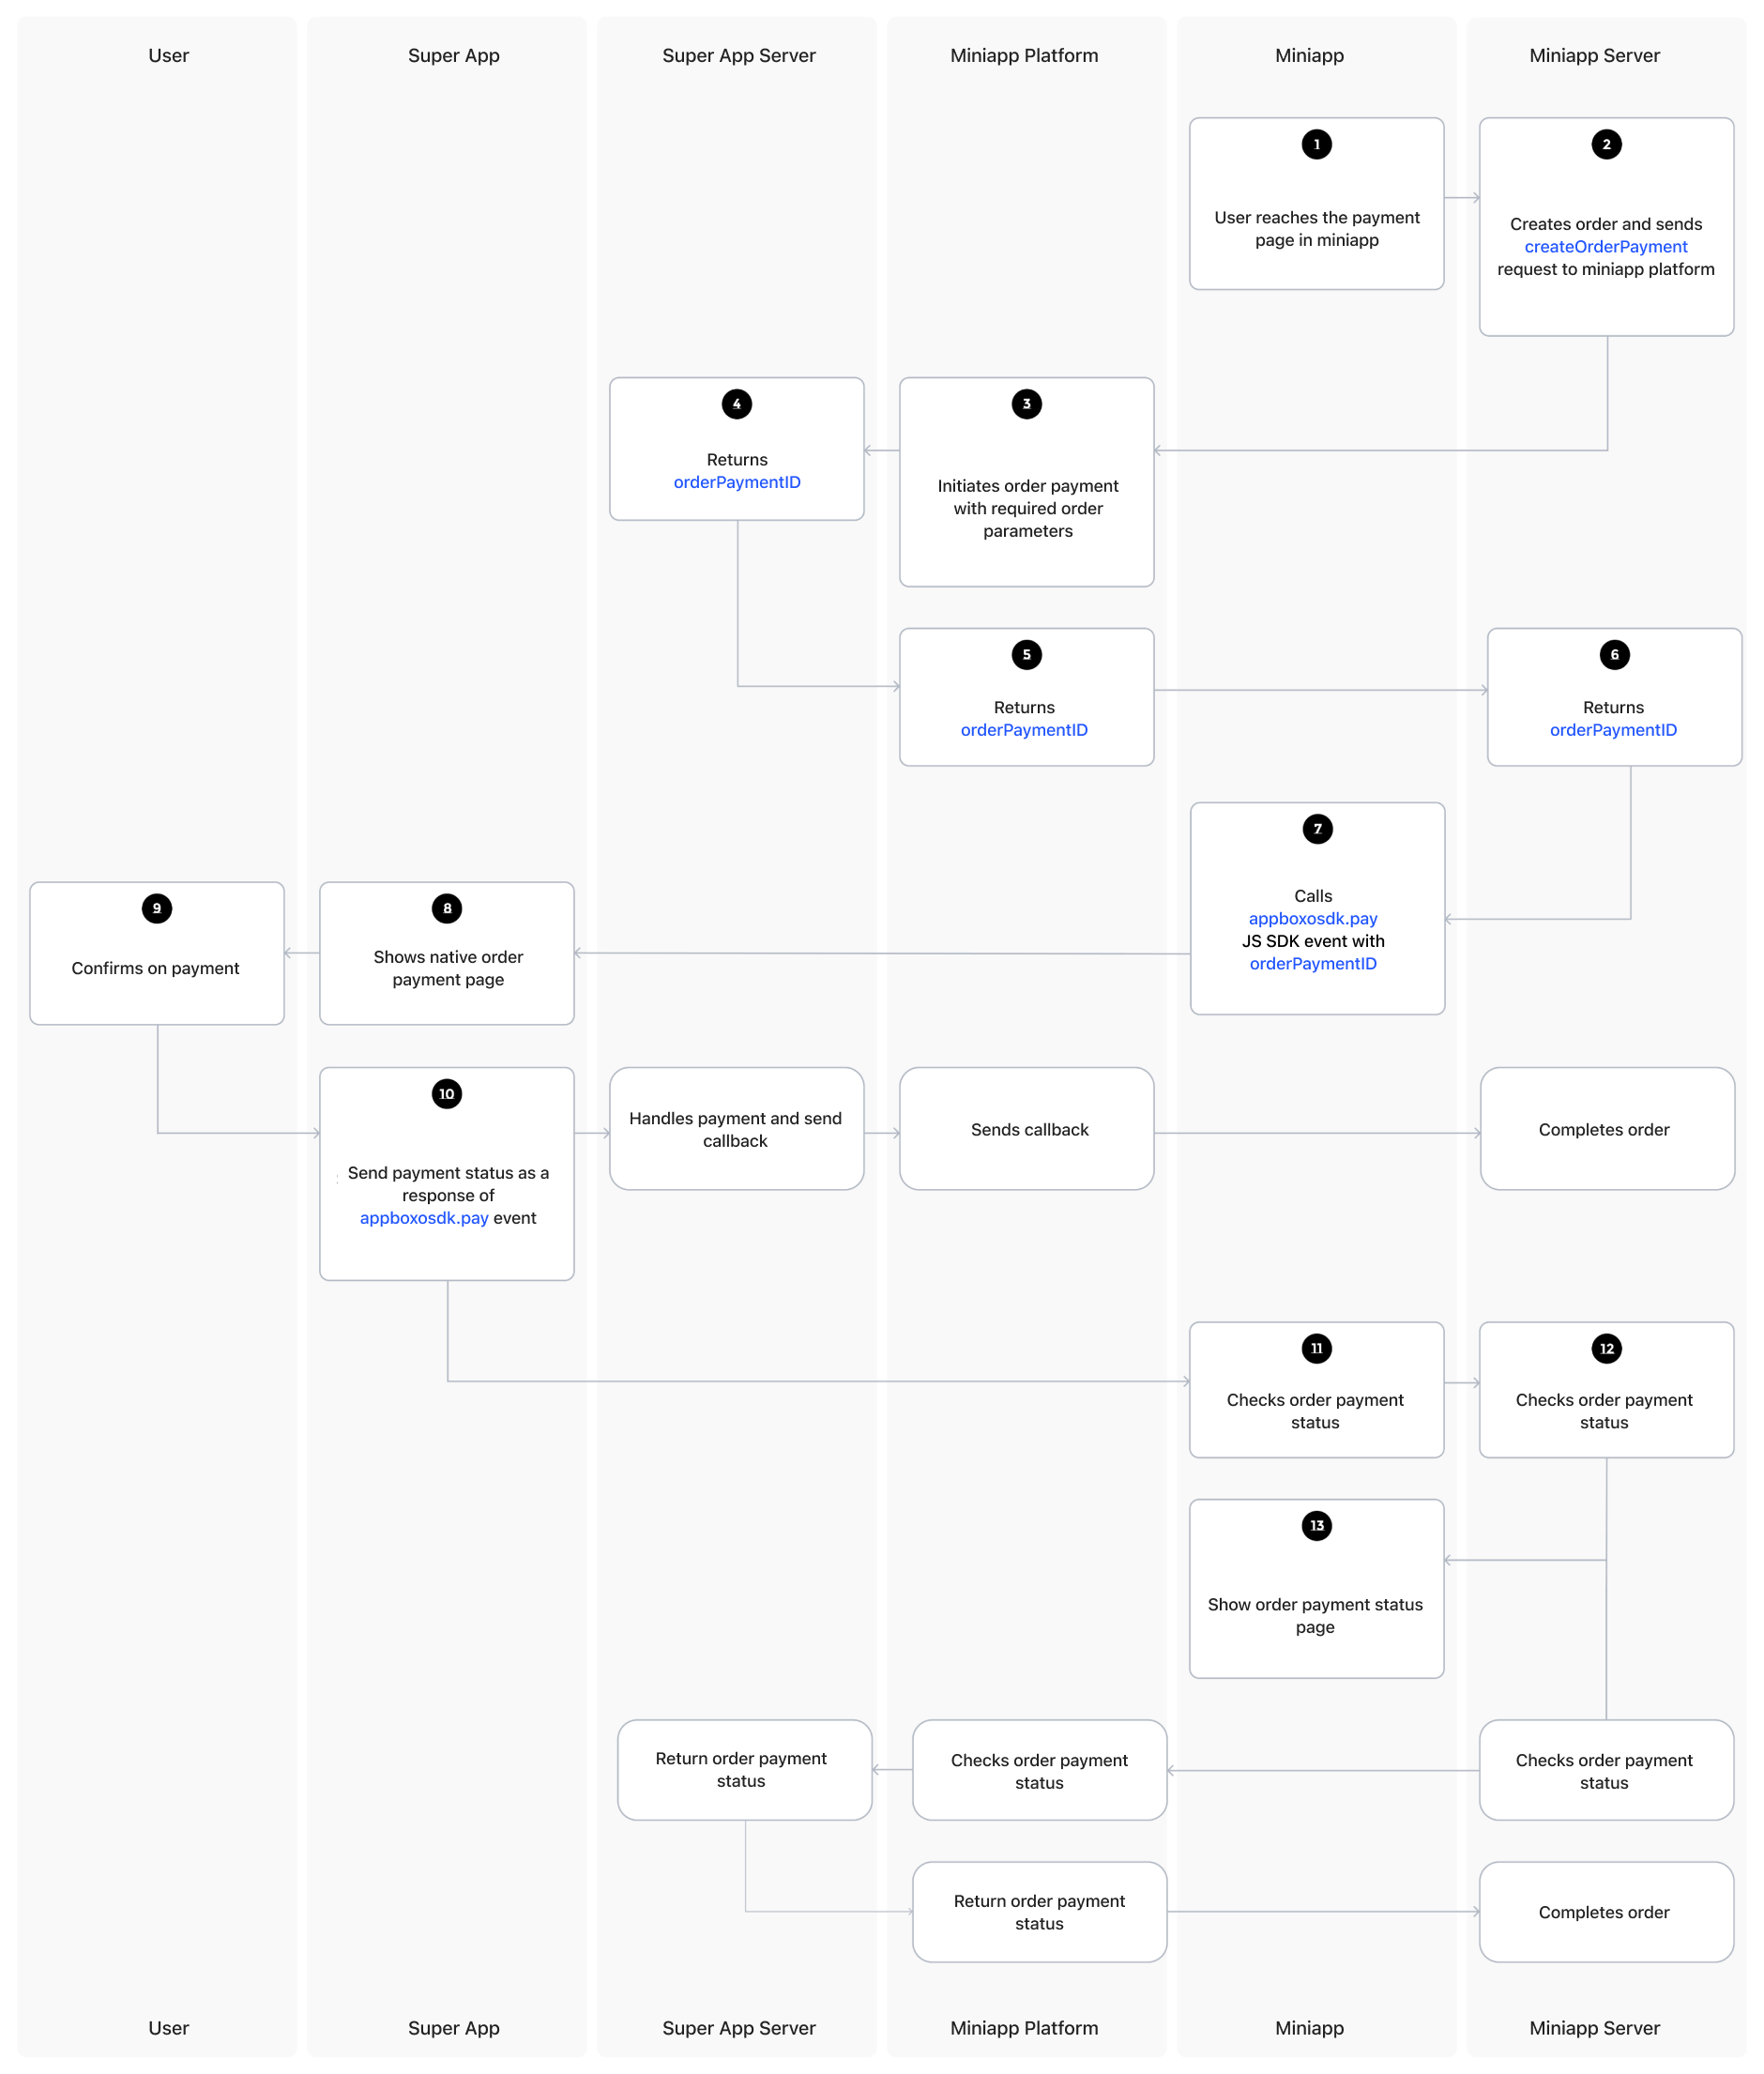
Here is a diagram illustrating the payment process for a miniapp order using the host app’s payment system.

1
User initiates payment
The user navigates to the payment page in the miniapp and initiates the creation of an order.
2
Miniapp creates order request
The miniapp server creates the order and sends a createOrderPayment request to the Boxo Platform.
3
Platform initiates payment process
The Boxo Platform initiates the order payment process on the host app server.
4
Host app returns payment ID
The host app server returns an orderPaymentID to the Boxo Platform.
5
Platform forwards payment ID
The Boxo Platform then forwards the orderPaymentID to the miniapp server.
6
Miniapp receives payment ID
The miniapp server passes the orderPaymentID to the miniapp.
7
SDK receives payment request
The miniapp forwards the orderPaymentID to the Boxo JS SDK’s
pay method.8
Native SDK displays confirmation
The Boxo Native SDK captures the Boxo JS SDK’s pay event (with the orderPaymentID) and displays a payment confirmation page to the user.
9
User confirms payment
The user confirms the payment.
10
Host app processes payment
The host app processes the payment and sends the payment status as a response to the Boxo JS SDK pay event.
- During this process, the host app server sends a callback to the Boxo Platform, which updates the order status in the miniapp backend.
11
Miniapp processes payment status
The miniapp processes the payment status received from the Boxo JS SDK event and confirms the order payment status on its server.
12
Payment status finalized
The miniapp finalizes the order payment status.
- If the order is still processing at this stage, the miniapp will request the payment status from the Boxo Platform, which, in turn, will query the host app server for an update.
13
Display payment result
Finally, the miniapp displays the order payment status page to the user.
Setting up the backend
Setting up the backend
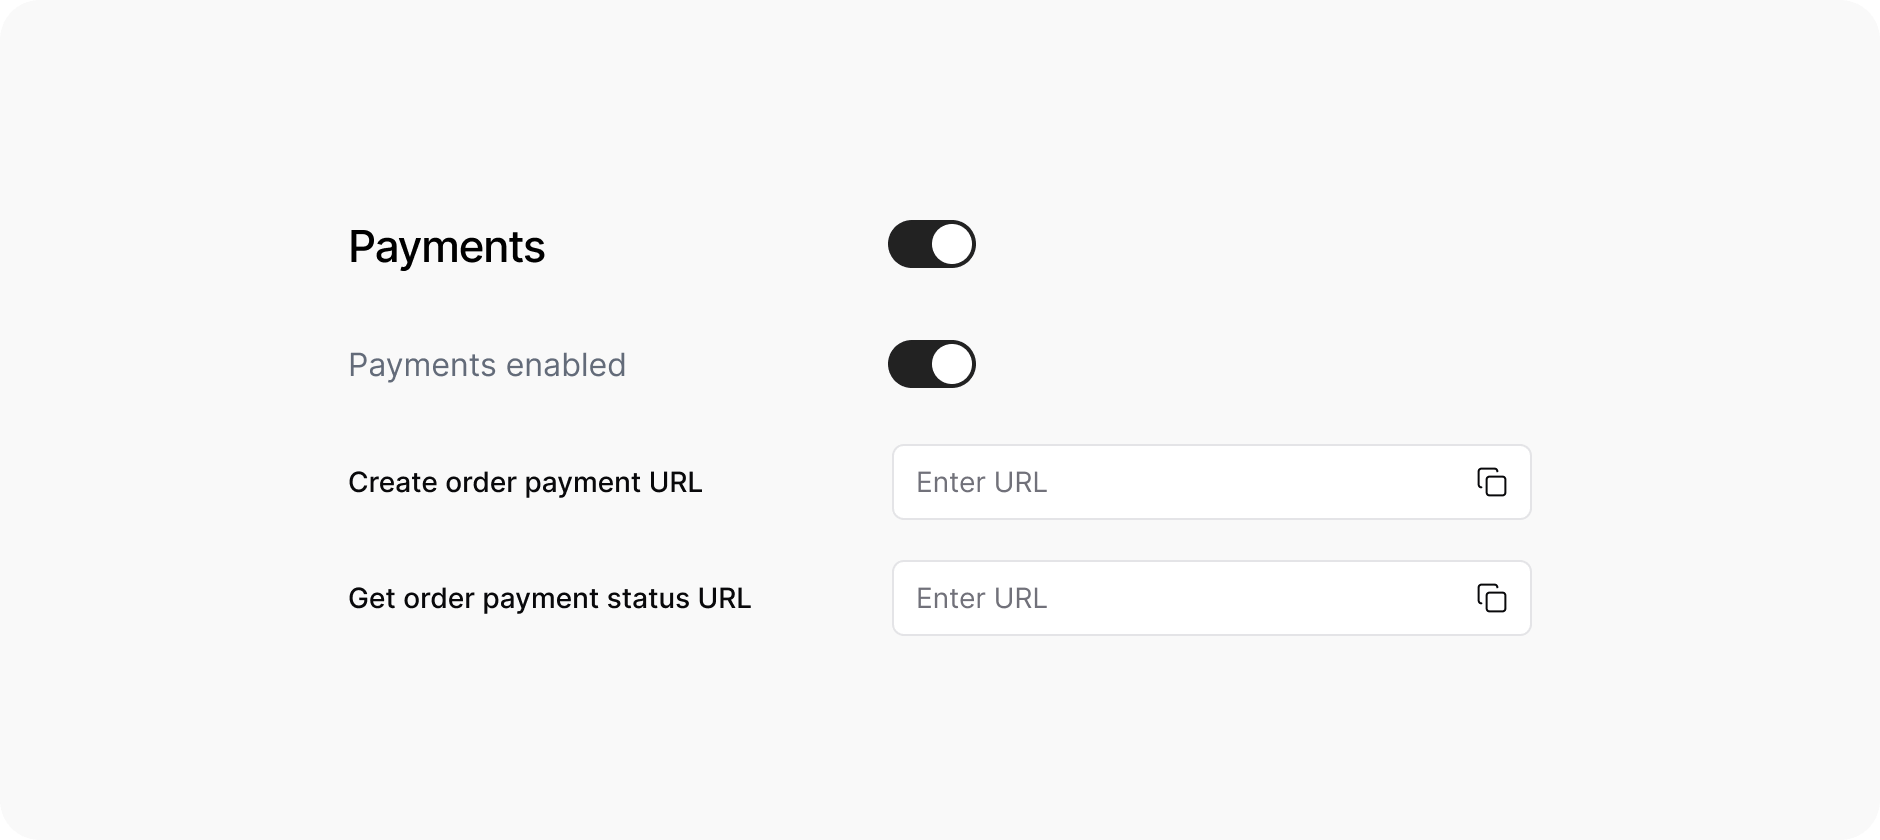
*Note: Feature must be enabled in Dashboard Partnership

1. Create Order Payment Endpoint
1. Create Order Payment Endpoint
This endpoint allows the Boxo Platform to create an order payment (refer to Step 3 in the diagram).URL and METHOD:This endpoint must handle a HTTPS POST request
URL to endpoint must be provided in Dashboard
OrderDetails:
OrderItem:
OrderShippingAddress:
Response:
Request Example:

| Key | Value |
|---|---|
Authorization | <prefix> <base64 encoded(hostapp_client_id:hostapp_secret_key)> or token from Get access token can be used instead |
Content-type | application/json |
X-User-ID | <Hostapp user reference> |
- Default
<prefix>:Token. Access token prefix can be set in Boxo Connect. - To use user access token from Boxo Connect as authorization token enable
Use access tokenin Dashboard. hostapp_client_idandhostapp_secret_keymust be provided in Dashboard
| Field | Data type | Description |
|---|---|---|
app_id | String | Miniapp identifier |
order | OrderDetails | Order info (amount, currency and etc.) |
| Field | Data type | Optional | Description |
|---|---|---|---|
currency | String(20) | No | Currency code for the order (e.g., ‘USD’) |
amount | Decimal | No | Total order amount (decimal with 2 decimal places) |
subtotal_amount | Decimal | Yes | Subtotal before taxes and shipping (decimal with 2 decimal places) |
shipping_amount | Decimal | Yes | Shipping cost (decimal with 2 decimal places) |
discount_amount | Decimal | Yes | Total discount applied (decimal with 2 decimal places) |
tax_title | String(250) | Yes | Title/name of the tax |
tax_amount | Decimal | Yes | Tax amount (decimal with 2 decimal places) |
taxes_included | Boolean | Yes | Boolean indicating if taxes are included in the price |
note | Text | Yes | Additional notes for the order |
custom_attributes | JSON | Yes | JSON field for custom order attributes |
miniapp_order_id | String(255) | Yes | Order ID from the miniapp side |
hostapp_user_id | String(255) | Yes | User ID from the host app |
items | OrderItem[] | Yes | List of order items (see OrderItem below) |
shipping_address | Object | Yes | Shipping address details (see OrderShippingAddress below) |
| Field | Data type | Optional | Description |
|---|---|---|---|
product_name | String(250) | No | Name of the product |
product_variant_name | String(250) | No | Product variant name |
product_sku | String(250) | No | Product SKU/identifier |
product_image_url | String(500) | No | URL to product image |
quantity | Integer | No | Quantity of the product (positive integer) |
price | Decimal | No | Price per item (decimal with 2 decimal places) |
discount | Decimal | No | Discount per item (decimal with 2 decimal places) |
| Field | Data type | Optional | Description |
|---|---|---|---|
address1 | String(1000) | Yes | Primary address line |
address2 | String(1000) | Yes | Secondary address line |
first_name | String(250) | Yes | First name |
last_name | String(250) | Yes | Last name |
phone | String(250) | Yes | Phone number |
region_name | String(100) | Yes | Region/state name |
region_code | String(100) | Yes | Region/state code |
province_name | String(250) | Yes | Province name |
province_code | String(250) | Yes | Province code |
city | String(250) | Yes | City name |
country | String(250) | Yes | Country name |
postal_code | String(250) | Yes | Postal/ZIP code |
latitude | Decimal | Yes | Geographic latitude (-90 to 90, 15 decimal places) |
longitude | Decimal | Yes | Geographic longitude (-180 to 180, 15 decimal places) |
- Response status must be
200in all cases - Response body:
| Field | Data type | Optional | Description |
|---|---|---|---|
order_payment_id | String(250) | No, except error_code provided | Order payment identifier |
error_code | String | Yes | If some error is occured error code should be provided. Example: {"error_code": "INVALID_ORDER_DATA"} All error codes can be found here |
custom_attributes | JSON | Yes | JSON field for custom order attributes |
2. Get Order Payment Status Endpoint
2. Get Order Payment Status Endpoint
This endpoint is for Boxo platform to get order payment statusURL and METHODThis endpoint must handle a HTTPS POST request
Can be configured to be a GET method
URL to endpoint must be provided in Dashboard
Default
Response
Request Example

| Key | Value |
|---|---|
Authorization | <prefix> <base64 encoded(hostapp_client_id:hostapp_secret_key)> or token from Get access token can be used instead |
Content-type | application/json |
X-User-ID | <Hostapp user reference> |
<prefix>: Token. Access token prefix can be set in Boxo Connect.
To use user access token from Boxo Connect as authorization token enable Use access token in Dashboard.
hostapp_client_id and hostapp_secret_key must be provided in DashboardBody| Field | Data type | Description |
|---|---|---|
app_id | String | Miniapp identifier |
client_id | String | Hostapp identifier |
order_payment_id | String | Order payment identifier |
- Response status must be
200in all cases - Response body
| Field | Data type | Optional | Description |
|---|---|---|---|
app_id | String | No, except error_code provided | Miniapp identifier |
client_id | String | No, except error_code provided | Hostapp identifier |
order_payment_id | String | No, except error_code provided | Order payment identifier |
payment_status | String(100) | No, except error_code provided | Order payment status: in_process, paid, cancelled, failed |
payment_fail_reason | String | Yes | Order payment fail reason |
custom_attributes | JSON | Yes | JSON field for custom order attributes |
error_code | String | Yes | If some error is occured error code should be provided. Example: {"error_code": "ORDER_NOT_FOUND"} All error codes can be found here |
3. Webhook Complete Order Payment
3. Webhook Complete Order Payment
This endpoint is part of the Boxo Platform. It sends a request to the miniapp server to complete the order payment after the payment has been processed (refer to the step after 10 in the diagram).URL and METHODThis is HTTPS POST
Body
Response:
Request ExampleResponse Example
/api/v1/orders/complete-order/ endpoint
IP address of requesting services must be provided in Dashboard for whitelisting or Request Signaturing must be enabledHeaders| Key | Value |
|---|---|
| Content-type | application/json |
| Field | Data type | Optional | Description |
|---|---|---|---|
order_payment_id | String(250) | No | Order payment identifier |
app_id | String | No | Miniapp identifier |
client_id | String | No | Hostapp identifier |
payment_status | String(100) | No | Order payment status: in_process, paid, cancelled, failed |
payment_fail_reason | String | Yes | Order payment fail reason |
custom_attributes | JSON | Yes | Order custom attributes |
- Response status will be
400in case there is error_code - Response body:
| Field | Data type | Description |
|---|---|---|
| code | String | Request result code example: SUCCESS |
| message | String | Result message |
| error_code | String | Error code |
| error_message | String | Result error message. All error codes can be found here |
Setting up the SDK
Setting up the SDK
Listening for Payment event
- iOS
- Android
- Flutter
- React Native
- Capacitor
- Expo